Pages

Thursday, 3 March 2016

How to Remove Make-up Correctly


After a long exhausting day, or on weekend nights when you are home in the early hours of the morning, you may be tempted to skip removing your make-up and jump straight into bed. Although it may not seem like a big deal, leaving your make-up on overnight can cause your lashes to dry and break, your pores to clog up and cause breakouts. By simply taking a minute or two to follow these quick and easy make-up removal tips, you will wake up with refreshed and happy skin.

Start with removing your eye make-up first. If you are wearing heavy eye make-up or waterproof mascara try using an oil-based product. This will quickly dissolve and breakdown the make-up making it easier to remove. Saturating a cotton wool pad in the eye make-up remover of your choice, hold the cotton pad against your closed eye for 10-20 seconds.
Placing the pad against your eye using gentle pressure will allow the make-up remover to dissolve the make-up, ensuring it will wipe off with ease and with little rubbing as possible. Remember that the skin around your eye is thinner than the skin on the rest of your face, so avoid any harsh rubbing. If needed, use a clean cotton pad to get all traces of mascara, eyeliner and eyeshadow off.

To remove make-up on your face, such as foundation, blush and bronzer, a selection of products can be used.  I like to start with using a make-up wipe and then follow up with my daily cleanser. This ensures I get all the make-up off my face and don’t have any leftover traces clogging my pores. Afterwards, rinse your face with lukewarm water and pat dry with a towel.

An extra step in removing your make-up is the use of a toner. For those nights where you have a little extra time to spend on your skin, using a toner can help make you feel refreshed. Applying generously to a cotton pad, wipe all over your face to remove any traces of make-up, dirt and oil that your cleanser may have missed.

Hopefully these quick and simple tips will help you successfully remove your make-up and wake up with refreshed, happy skin. Let me know in the comments below what you use to take off your make-up at the end of a long day.

Until next time beauties, have a great day and I will see you in my next blog post,


Wednesday, 2 March 2016

How to Create the Perfect Top Knot


A hair style I have been loving recently is the top knot! Top knots are perfect because you still look put together whilst having your hair up off your face. Top knots are pretty easy and don't take much effort, however here are my quick simple steps to help you achieve this hair do.

Step 1
Placement is key when it comes to creating the perfect top knot. In an ideal world, the top knot should sit flat on the top of your head, ensuring it is not too far back. Pulling all the hair upwards, ensuring the back of the hair is nice and smooth, secure the hair in place with an elastic.

Step 2
To create a top knot that has lots of volume (my fave), back comb the ponytail for extra fluffiness.

Step 3
Once step 2 is completed, twist the hair into a circular shape around the hair elastic. Hair donuts can be used to help achieve the shape.

Step 4
To secure the bun in black, use some hairpins. However, if you back combed the hair, you shouldn't need to keep it in place.

Step 5
To finish and hold the look, apply some hairspray.

And you are done! I love this look as it is so quick and easy to do, but it really looks like I spent a lot of time on my hair. Let me know your favourite hairstyles to keep your hair out of your face. Until next time beauties, have a great day and I'll see you in my next blog post,


Soap and Glory


I am so easily won over when it comes to products that are packaged in such a pretty way. This is what happened to me when it came to Soap and Glory.

For years I have loved this brand. Soap and Glory can be found in Boots stores all across the UK. Unfortunately I am unsure whether these broads are sold in international stores, however I'm sure you will be able to find them online. In Boots these products are often on promotion which is fabulous but also dangerous for my addiction. Not only do these products come in pretty packaging but they smell amazing too! Below I have listed some of my favourite products from the range.


Soap and Glory Flake Away Body Scrub 

This product is absolutely insane! Not only does is smell absolutely amazing, but it exfoliates my skin beautifully during the week to help me maintain my tan and get rid of any dead skin.
Buy here: Flake Away Body Scrub

Soap and Glory Sexy Mother Pucker XL Lip Plumping Gloss

Unfortunately we all can't have beautiful big lips and girls like me need some help sometimes. When I first purchased this gloss I was a little sceptical and doubted it would really make that much of a difference. However, it definitely delivered and gave me plumper looking lips.
Buy here: Sexy Mother Pucker XL Lip Plumping Gloss

Soap and Glory The Righteous Body Butter

Again the first thing I have to comment is the smell of this product- incredible! I love to lather myself in this body butter, not only does it make me smell amazing, but also helps my skin stay moisturised.
Buy here: The Righteous Body Butter

Soap and Glory Clean on Me Creamy Shower Gel

Apart from the smell, which of course is going to be amazing (spot a trend yet?), this product leaves me feeling clean and fresh all day long.
Buy here: Clean on Me Creamy Clarifying Shower Gel

Soap and Glory Drama Clean 5in1 Micellar Cleansing Water

This is by far one of the best products to remove your make-up with. I have tried multiple cleansing waters, and this one is the best by far! I guarantee, once you have used this to take your make-up off your skin will be feeling refreshed and revived.
 
Although I haven't tried out all of the Soap and Glory products, I can say that I have been delighted by each and everyone. Above are just a few of my favourites, however there has not been one product from the range that I haven't enjoyed using.

Until next time beauties, take care and have a fab day,


Tuesday, 1 March 2016

Skincare 101

 
Today I wanted to make a post covering all the basics of skincare. When I first started out with skin care products I had absolutely no idea what I should be using or if it was right for me. The first step to taking care of your skin, is figuring out what skin type you have, whether that’s oily, dry, normal or a combination. For myself I struggle with an oily t-zone, however the rest of my face is normal- this is known as oily/combination skin. This is extremely helpful for tailoring the products I use to help me with this problem. Now we have that out of the way, let’s talk about a few of the steps in my skin care routine.
 

Cleanser

There are many different versions of cleansers/face washes out there, suited to everyone’s needs. My recommendation is not to using an exfoliating cleanser as it is too harsh on the skin when it is being used so frequently. By washing your face both morning and night, this will remove all the dirt and oil that has built up on your face, and will help minimise breakouts.

Toner

Although this part is not essential, adding a toner into your skincare routine will help smooth, soften and calm the skin, whilst removing any left-over traces of make-up. Toners are filled with skin repairing ingredients that will rehydrate and replenish the skin’s surface after being cleansed. If you suffer particularly from dry patches or redness, a toner will help in minimising these.

Exfoliating

Exfoliants are used to remove the build-up of dead skin cells. By removing these dead skin cells, the skin can appear looking healthier and more radiant. Exfoliating can help eliminate pores becoming clogged, an uneven skin tone and dullness. However, be careful not to over exfoliate the skin. I would recommend to use an exfoliant of your choice 3/4 times a week.

Moisturising

Daily moisturising is key for everyone, not just if you have dry skin. I used to think applying moisturiser would add more oiliness to my face so I never used to moisturise (gasp). However, with the correct products moisturiser can actually help us girls with oily skin. Moisturiser helps balance the moisture in your skin, so applying the correct type of moisturiser depending on your skin type will improve your skin dramatically.
 
Although this is a very basic skincare routine, almost everyone should be following a similar process for taking care of their skin both in the morning and at night. Adapting this routine and adding in products that are suited to your skin type will give you the best results.

If you would find it useful for me to go further into detail and tailor a skin care routine for each different skin type and each different skin problem, please let me know in the comments below. Until next time my beauties, have a lovely day and I’ll see you in my next post,


The Best Budget Make-up Brushes

I have always been a little sceptical with budget brands make-up brushes. I have always been a big believer that your makeup will only look as good as the tools you apply it with. However, recently my opinion has changed and my bargain brushes sit happily with my higher end investments. The handles of these make-up brushes are now nice and heavy, which gives better control over the brush. Also, these budget brands are creating their brushes to a high quality, and have showed little signs of the brush bristles shedding. Below are some of my budget options that have earned their spot in my make-up kit. 

Topshop Makeup Neon Pink Brushes, from £4topshop.com
These brushes are absolutely fab, plus they are pink what more could a girl want? I would recommend these of the signature black range that Topshop offer, not only because of the colour but the general quality of the brushes. My faves are the foundation, smudged and slanted eyeshadow brushes. 
Real Techniques, from £6.99realtechniques.com
A well priced and well known range of make-up brushes are from Real Techniques. Brush kits are priced around £20 which I think is a steal for these brushes. A particular favourite of mine which deserves a mention is the Real Techniques beauty sponge- similar to the beauty blender this flawlessly applies make-up and is well worth a try!

Eco Tools, from £4.99boots.com
If you are looking for brushes that are eco friendly and cruelty free, Eco tools is just for you. These brushes come at a fair price and have the softest bristles! My top picks are the deluxe concealer brush and the bamboo eyeshadow brush.  

Models Own, from £4modelsownit.com
These are not only a bargain but are also great looking. In particular I would recommend buying the eyeshadow brushes, or the five piece brush set for just £10.

Leave a comment below letting me know your favourite make-up brushes, whether they are budget busting or not! Until next time beauties, have a great day and I'll see you in my next post,


Monday, 29 February 2016

How to Prevent Oily Hair


Hello beauties! Today I wanted to talk about a personal beauty problem that I have faced for years! In the strive for beautiful shiny locks, my hair has often ended up looking more oily than I would hope for. However, what I didn’t realise was what was actually causing oil to build up in my hair. Below I have listed some of the reasons why your hair could be so greasy, and hopefully we can combat this issue together.
 

Serums

I love a good shine serum, however these products must be used sparingly. By adding a small amount to the ends of the hair where the hair is drier will be much more effective than smothering it all over the hair, which will end up in the hair looking super greasy.
 

The Wrong Shampoo

Picking the wrong shampoo or using a particular brand for too long can cause oil build up in your scalp. Using a shampoo that is designed specifically for oily hair can transform your hair from greasy to gorgeous.
 

Lack of Vitamin B

If you suffer from greasy hair there is a possibility you are lacking in B vitamins. The intake of these vitamins can directly affect the level of sebum (oil) your roots produce.
 

Stress

When I am stressed I can definitely see a difference in the greasiness of my hair. Due to the fluctuation in hormone levels, the scalp and skin can become more oily than usual. This tends to be why we break out during stressful periods.
 

Touching your hair too much

A guilty habit of mine is playing around with my hair too much once I have styled it in the morning. The oil that our hands produced is transferred onto our hair when we are touching it, causing it to become greasier.
 

Hormones

Unfortunately the Pill in particular can trigger changes in hormone levels and encourage excess sebum production, leaving your roots oiler than usual. If you notice a correlation between when you started the Pill and having oiler roots, check in with your GP and see if you can switch.
 

Over shampooing

Over washing hair can cause your roots to produce even more oil than before. Washing hair more than once a day will be counterproductive and make your hair greasier.
 

Too much conditioner

The best way to know if you are using too much conditioner is after a shower. If you’ve finished rinsing your hair after a shower and it still feels greasy, chances are you are putting on too much conditioner. Instead try only using conditioner on the ends of your hair for a week to let your scalp rebalance.
 
Finding the reason behind your greasy hair can be the solution to combatting oil. Hopefully the above post has shed some light and you can be one step closer to gorgeous glossy hair! Until next time my loves,  


Sunday, 28 February 2016

DIY Makeup Organisation and Storage


Keeping all your beauty needs in one place is not always an easy job, especially since we don’t use the same products every day. With spring cleaning right round the corner, these DIY makeup organisation and storage tips will help you avoid being fashionably late!


Makeup Brush Display                                    


A cute way to store and display makeup brushes it by keeping them in a jar of some sort. Not only is this a cool way to display brushes, but it also makes brushes very easy to access. All you need is a glass jar of some sort, some decorative stones and your makeup brushes of course.


Recycled Makeup Organiser 

At first glance you would never believe that these storage jars are actually made of recycled plastic bottles! Cutting them to the appropriate size and ironing the edges for the finishing touch, this storage idea really makes a statement.


Candle Jar Holders

Old candle jars are another great way of storage your favourite beauty bits. Whether it be cotton balls, lipsticks or nail polishes, this is a good way to keep all these products together.


Hot Tools Storage

A good way to keep hot tools organised and in one place is by using a magazine holder. These can be found relatively cheap and are an excellent way of storing hot appliances.


Perfume Display

By using an old cake stand and displaying your favourite perfumes, can add a touch of elegance to your décor. Cheap but chic, love it!


Hair Product Organisation

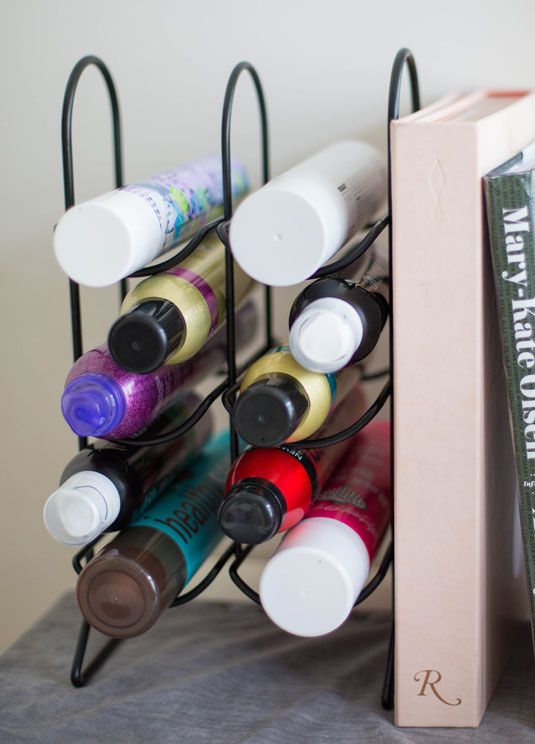
To keep those pesky hair products from rolling around your drawer, try using a old wine rack. By stacking your hairspray, dry shampoo and more on a wine rack, you'll find it much easier to grab the product you need and style those locks.


Organising your drawers

A quick and simple way to organise your drawers is by using a kitchen utensil tray. The limits are endless to what you can store in these trays.
 
Let me know in the comments below your favourite way to store your beauty items. Hopefully this gave you inspiration for organising your beauty items. Until next time beauties,