Pages

Showing posts with label beauty and the budget. Show all posts

Friday, 15 April 2016

Beauty Wish List: Spring 2016


Hello beauties! Today I wanted to compose a blog post of some of the beauty products I am dying to try this spring. I love reading wish lists and they always give me inspiration on what to pick up on my next beauty shop. Hopefully my blog post will bring you some inspiration and maybe help inform you of some of the new products that have launched.


Maybelline Blushed Nudes Palette


Currently, in Boots at the moment this palette is a steal at £7.99. When this was advertised on the TV and I first seen it for the first time I knew I needed this product in my life. The eyeshadow colours in this palette remind me very much of the Naked 3 palette by Urban Decay. I am really excited to pick this palette up and try out some blushed nude eyeshadow looks.

Wednesday, 13 April 2016

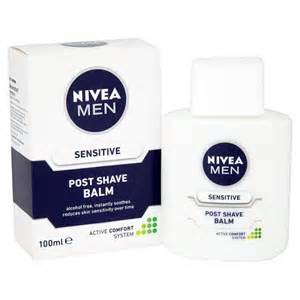
Nivea Men's Post Shaving Balm


You may be reading this blog post and thinking I've gone absolutely bonkers, but bear with me for two minutes and I'll explain myself.

Recently all over YouTube I have seen bloggers rave about this little product and using it before they apply their makeup so of course I had to give it a go. I was a little sceptical at first, not really understanding why I was putting a men's post shaving balm on my face, but miraculously this did work wonders.

Tuesday, 5 April 2016

Best of Drugstore: Blushers


If there’s one product that can instantaneously transform your make-up it has to be blush. Most make-up artists will tell you that your face make-up isn’t complete without a light sweeping of colour over your cheeks. I do believe that blusher can make my skin look healthy and radiant when it normally appears sallow and tired.

But finding the right blush to give you the desired effect you want can be tricky. No amount of technique can save your make-up from appearing chalky, oily or clown like. To help, I have compiled a few of my favourite blushers from the drugstore that will help you achieve the perfect blush look.

Monday, 4 April 2016

March Favourites


Another month past, can youse believe we are a quarter way through 2016 already? As always I wanted to share my favourites of the month. Unfortunately, I don’t have many to talk about but there are some little treasures you may like to try out.


The Body Shop Body Butter


First up is this body butter by The Body Shop. I absolutely adore these body butters, however they are slightly pricey. So when I stopped by and seen there was 50% I just had to pick up a couple. My favourite scent of this product 100% has to be “passion fruit”. This product is very thick and creamy and is fantastic for adding moisture back into the skin. This product used to be a favourite of mine last summer, so the scent of this reminds me of many good memories from last year.

Wednesday, 30 March 2016

Handbag Beauty Items


My bag pretty much contains everything but the kitchen sink. I am very much a “oh but what if I need this” type of person and have a hard time cleaning out my bag and getting rid of the unnecessary bits and bobs! However, amongst what is mostly junk I have a small number of beauty products that I keep in my Forever 21 beauty bag which I thought I would share with you all today.


Soap & Glory Hand Food

The first product that I like to keep in my handbag for easy access is hand cream. I am someone who suffers from very dry hands so I like to regularly moisturise them. The Soap and Glory hand food is definitely one of the best hand creams I have used plus it smells absolutely delicious!

Friday, 25 March 2016

Easter Weekend Beauty


The long weekend has finally arrived! Sweet-toothed beauty fans rejoice; you have the perfect excuse to eat your body weight in chocolate. As for make-up I have listed below a few ideas that I think will get you through this Easter weekend.

Wednesday, 23 March 2016

The Best Hair Texturizing Products


I’m a girl that loves my hair to be big and voluminous with very little effort. There has been a lot of products that have popped onto the market over the years, and today I wanted to share with youse some of my faves; which of course are all budget friendly.

Tuesday, 22 March 2016

How to Deep Clean Make-up Brushes


One thing I really hate to do is clean my make-up brushes, but unfortunately it is a must. Every time you use a make-up brush you are picking up bacteria on your face, which is then left to fester on the brush after use. Therefore, the next time you pick up this brush to use the bacteria that has been left to fester is going to be applied to your face when you go to use the brush. Disgusting isn’t it? It’s a vicious cycle and it will make you break out, unless of course you clean your brushes. Obviously brushes that are predominantly used for eyeshadow will not be a problem and can be washed every few weeks. However ones that are used on a regular basis for face products should be washed regularly, such as foundation brushes. If you suffer from acne or problematic skin, try washing your brushes more than normal and see if you notice an improvement.

Friday, 4 March 2016

How to 'Bake' Your Make-up


Cropping up all over you tube, are tutorials on how to 'bake' or 'cook' your make-up. Although this term has been used in drag for years, it came to be more well known when Kim Kardashians make-up artist posted this trick over Instagram.

'Baking' your make-up consists of letting translucent powder sit on your face between 5 and 10 minutes. This allows the heat from your face to set the foundation and concealer. Once dusted off, it should leave you with a flawless, crease less finish.

To start, ensure your eye area is well hydrated. Applying eye cream around this area will hydrate and plump the skin, whilst minimising the appearance of any fine lines. I like to use the Palmers Cocoa Butter Smoothing Eye Cream.

Next apply a thick concealer under the eyes. Although concealer contains oils that have a tendency to crease, if set properly this will not happen. I use the Collection 2000 Concealer, applying it in a triangle shape under my eyes and blending.

Next dust on a layer of translucent powder. Try using a fluffy eyeshadow brush to pack this onto the area where we just put concealer. A particular favourite of mine is the Ben Nye Translucent Powder.

Next comes the 'baking'! Using a damp Real Techniques Beauty Sponge, dip into the translucent powder and dab generously over the area where you applied concealer. Leave the powder to set for around 5 to 10 minutes.

Finally dust off the excess powder with that same fluffy eyeshadow brush and boom you are baked! Leave a comment below and let me know how you found this technique.

Until next time beauties, have an amazing day and I'll see you in my next post,

At Home Pamper Routine


I don't know about youse, but for me this week has been hectic and stressful! When life does get a bit too much, I love to take some me time and pamper myself. Today I am going to show you how you can also have an at home pamper session! Because who doesn't love a good pampering?

First off, we need to start with picking the right scented candle. I am a massive fan of Yankee Candles and have many favourites that I like to use. What is also great is Yankee Candles can be found online for extremely good prices. My favourite at the moment that I like to burn when I'm feeling pretty stressed is Pink Sands. It reminds me of being on holiday, and what's more relaxing than the thought of lying on a nice sunny beach with a cocktail in hand?

Next up is of course music! I love to listen to music to relax, whether they be chilled or upbeat songs. At the moment I am OBSESSING over the 1975! Their song 'Somebody Else' is just incredible.

And of course it is a given that we have to wear fluffy dressing gowns, what pampering session would be right without one? This step isn't necessary and some cosy jammies will do instead. But if you are like me and want to feel extra pampered, grab that robe girl.

A beverage is a must when we are pampering ourselves since we have to stay hydrated. I have loved sipping on some freezing cold peach ice tea at the moment. Makes me feel refreshed.

Next, it's time to annoyingly take the make-up off. Using make-up wipes will help do the job plus it's quick and simple too. Afterwards wash your face with your everyday cleanser and you are good to go.

The next step in our pamper routine is so obvious- a bath! I love to a warm bubble bath filled with lush goodies. Not only do I come out smelling amazing but I truly feel relaxed afterwards.

Next I will wash my hair with my usual shampoo and conditioner, and if I'm feeling my hair needs some extra TLC I will follow up with a hair mask. After I will wash my body and make sure I'm not only clean but I'm smelling lush. My favourite at the moment is the Foam Burst body washes by Imperial Leather. The Japanese Spa scent is to die for!

Once I am done relaxing in my bubble bath, I will wrap my hair up in a towel and hop on out. Drying off my body, I apply some of the Soap and Glory The Righteous body butter.

It's face mask time!! Usually I will make a home made face mask and pop this on over my face. If you haven't checked it out already here are some of my favourite home made face masks.


To pamper my lips, I will take a little bit of sugar and my toothbrush. Applying the sugar to my lips and lightly exfoliating with my toothbrush over top will help get rid of the dry patches and give me soft, smooth lips.

For the grand finale, time to paint those nails! And there you go, that's my own at home pamper session. I hope you are feeling nice and relaxed after following some or all of these steps.

Until next time my beauties, take care and I'll see you in my next post,


Strobing 101


Why look sculpted when you can look dewy?

Just when we had started wrapping our heads around contouring a new make-up craze has occurred. In simple terms, strobing is basically just a fancy word for highlighting. Forget about contouring, going crazy with the highlighter will give you a dewy, more youthful glow. To keep you on the right track and keep you looking glowy and not sweaty, here are a few tips.

Prep your skin
Strobing is all about getting the perfect glow. Moisturising your skin  will replenish dull, dry skin. I would recommend using an oil free moisturiser.

Pick the Correct Shade
Use a Highlighter that is going to suit and compliment your skin tone. If you have fair skin, opt for a pink champagne colour. If you have medium skin, go for a peach champagne colour. If you have olive skin, a gold shade will look perfect on you. And if you have dark skin opt for a beautiful copper colour. Instead of going out and buying an expensive highlighter, why not try using a sheer eyeshadow.

Highlight the Parts that Catch the Light

Along your cheekbones, down the bridge of your nose, below your brow bone, along your temples the corner of your eyes and your Cupid's bow are all places where you should be placing your highlighter. This will enhance your natural features without going overboard.

Blend
After you've applied your highlighter, using either your fingertips or a fan brush blend out the product to avoid any harsh edges.

For those of you will oily skin, like myself, opt for a matte bronzer or blush to avoid looking like a disco ball.

And that's it beauties! To me this isn't as hard to grasp as contouring, and gives a beautiful youthful glow- perfect for spring!

Until next times lovelies, take care and I'll speak to youse in my next post,


Thursday, 3 March 2016

How to Remove Make-up Correctly


After a long exhausting day, or on weekend nights when you are home in the early hours of the morning, you may be tempted to skip removing your make-up and jump straight into bed. Although it may not seem like a big deal, leaving your make-up on overnight can cause your lashes to dry and break, your pores to clog up and cause breakouts. By simply taking a minute or two to follow these quick and easy make-up removal tips, you will wake up with refreshed and happy skin.

Start with removing your eye make-up first. If you are wearing heavy eye make-up or waterproof mascara try using an oil-based product. This will quickly dissolve and breakdown the make-up making it easier to remove. Saturating a cotton wool pad in the eye make-up remover of your choice, hold the cotton pad against your closed eye for 10-20 seconds.
Placing the pad against your eye using gentle pressure will allow the make-up remover to dissolve the make-up, ensuring it will wipe off with ease and with little rubbing as possible. Remember that the skin around your eye is thinner than the skin on the rest of your face, so avoid any harsh rubbing. If needed, use a clean cotton pad to get all traces of mascara, eyeliner and eyeshadow off.

To remove make-up on your face, such as foundation, blush and bronzer, a selection of products can be used.  I like to start with using a make-up wipe and then follow up with my daily cleanser. This ensures I get all the make-up off my face and don’t have any leftover traces clogging my pores. Afterwards, rinse your face with lukewarm water and pat dry with a towel.

An extra step in removing your make-up is the use of a toner. For those nights where you have a little extra time to spend on your skin, using a toner can help make you feel refreshed. Applying generously to a cotton pad, wipe all over your face to remove any traces of make-up, dirt and oil that your cleanser may have missed.

Hopefully these quick and simple tips will help you successfully remove your make-up and wake up with refreshed, happy skin. Let me know in the comments below what you use to take off your make-up at the end of a long day.

Until next time beauties, have a great day and I will see you in my next blog post,