Pages

Showing posts with label Revlon. Show all posts

Sunday, 28 February 2016

Top 5 Drugstore Lip Colours for Spring


Following my recent blog post on my top 5 drugstore nail polishes for Spring, I thought it would only be right to dedicate a post all about my favourite lip colours. During the next couple of months, I like to wear a more natural look during the day. However, depending on my mood and outfit I always like to switch up my lip colour.


Revlon Colorburst Lip Butter – Tutti Frutti


A different twist on the usual pink shades of Spring has to be this orangey red shade by Revlon. If you aren’t familiar with these lip butters you definitely should be. Due to the formula of these products the colour intensity is very sheer. This is great for an orange shade in the Spring, as it is different but isn’t too intense and bold. At £7.99 these are a great product for keep your lips beautifully hydrated.


L'Oreal Paris Color Riche Exclusive Nudes - Barely Peach by Julianne Moore


This lip colour is absolutely beautiful. For me I love wearing it as a pinky nude shade, for those days where my skin is a little bit lighter. For all the beauties out there with pale skin, this would be the perfect pink that would enhance your lighter complexion. At £6.99 and a variety of different nudish pink shades, there is one to suit every skin colour and tone.


No 7 Moisture Drench Lipstick – Rose Blush


During my time working in Boots as a No7 consultant I got very familiar with the brands own products. These lipsticks that No7 have created are absolutely amazing!! During a 9 hour shift I found myself only reapplying this lipstick 2/3 to maintain the vibrancy of the colour. At £9.99 these lipsticks in my opinion are a steal. Unlike many other lipsticks these add moisture into your lips similar to a lip balm. In particular I loved this bold pink colour for days where I wanted more of a statement lip.

Buy it here: No 7 Moisture Drench


Revlon Colorburst Matte Lip Balm – Elusive


A big trend last season that will for sure role onto Spring, is matte lips. I love the look of matte lips however I hate how drying matte lip products can be. However, with these matte lip balms that problem is solved. I absolutely LOVE these and cannot say enough good things about them. They are by far the most moisturising matte lip products I have ever tried and are worth every penny if you love matte lips just like I do. Elusive is a beautiful mid tone pink that will suit lighter to medium tone skins. At £7.99 I would definitely recommend trying these velvety matte lip balms for yourself.


Maybelline Colorsensational Elixir Lip


Last but certainly not least are the Colorsensational Elixir Lip products by Maybelline. Whether you are wearing these products on their own or over a lipstick or lip liner these are absolutely incredible and smell so good too! I could not pick just one colour for these lip products as each of them are absolutely beautiful in their own respect, however my most used colours have to be Blush Essence and Captivating Carnation. Individually these products cost £6.99, however currently at Boots they are on offer, at 3 for 2.


Leave a comment below on your favourite lip colours for the Spring time. Until next time,


Friday, 26 February 2016

The Best Drugstore Dupes

Everyone loves a good bargain, especially when we feel we are getting something of high quality for such a low price. Because of this beauty dupes are becoming very popular. Pintrest is a great source of inspiration, and below I have gathered a few of my favourite beauty dupes from the site.

MAC VS NYX


Like many make-up lovers, I adore MAC. However, not everyone has money to spend excessively on the high end make-up, therefore I wanted to find dupes for the make-up brand and in particular there eyeshadows. No one can deny the pigmentation of their shadows is fantastic and you really are getting what you pay for. A single MAC eyeshadow can cost £13, whereas the NYX dupe costs only £2.95. That's 4 eyeshadows for the price of 1. Above similar colours can be shown, and the pigmentation of the shadows is fantastic for the price. Not only is the pigmentation great, the NYX eyeshadows are super easy to blend. What a steal!!


Smashbox VS NYX


The colour correcting primer by Smashbox is a beauty must. With a 4.7/5 rating on the smashbox website I couldn't not look for a dupe for this product. According to Pintrest, this primer by NYX does exactly the same job as it's more expensive alternate. At only a fraction of the price (£10) of the smashbox primer (£25.50), this is definitely one to try!


MAC VS Drugstore


Is there anything better than a new MAC lipstick? I LOVE the formulation and colour range of these lipsticks, however what I don't love is the price. Setting me back £15.50 for a single MAC lipstick, I have been on the hunt for cheaper alternatives. Especially when it comes to night's out and not wanting to lose a lipstick you had to take a loan out for, or wanting to try new colours and see if they suit you, these dupes are perfect! The price of the lipstick dupes above do vary depending on brand, however are all a lot more affordable than the more expensive alternative. 


Make-up Forever VS Revlon


In 2015, Make-up Forever products really took off and were sold out almost everywhere I looked. Debenhams introduced these products to their site last year, and the HD PhotoReady foundation in my shade was sold out every time I looked. I was prepared to spend £29 due to the hype around this foundation however due to it not being in stock I had to look for an alternate. When researching dupes for this foundation I stumbled across the PhotoReady foundation by Revlon, which I already had in my make-up collection but had never used. This foundation does what it says, my skin looked healthy and radiant due to the light reflecting pigments it had within, and it gave me a flawless coverage which photographed beautifully. Slightly pricey for drugstore foundation, at £12.49 I think this is great cheaper alternative for those who love the Make-up Forever HD foundation!


MAC VS ELF


A great alternative for the MAC setting spray which retails at £17 is the elf make-up mist and set. At only £5 this is a definite steal!!


Benefit VS Drugstore


A brand I have loved for years is Benefit so when I found dupes for the products they have I was super excited!! Compared to the Benefit products above that range in the price region of £20-£30, the drugstore alternatives come at only a fraction of that cost. In particular, the ELF eyebrow kit is absolutely fantastic and I have kept it in my make-up kit for years. No matter what other eyebrow products I go to I always find myself going back to it.  


Benefit VS Maybelline


As I stated above, Benefit is one of my all time favourite brands that I have loved for years. The "They're Real" mascara that Benefit sells is absolutely incredible and really does transform your lashes. Not only does this give lift, definition and drama, this mascara is so amazing that you don't even need to wear false lashes!! At £19.50, this is definitely a splurge item, however because mascaras should be changed every 3 months due to hygiene reasons, this is an expense that we all can try to avoid. My alternate has to be the "Falsies Volume Express" by Maybelline. On Ebay you can grab this mascara for under £5 which means you could buy a years supply of this mascara for the cost of one Benefit mascara. By applying multiple coats of this mascara you will be able to create a similar look as created by the Benefit mascara.


High End VS Drugstore Blushes 


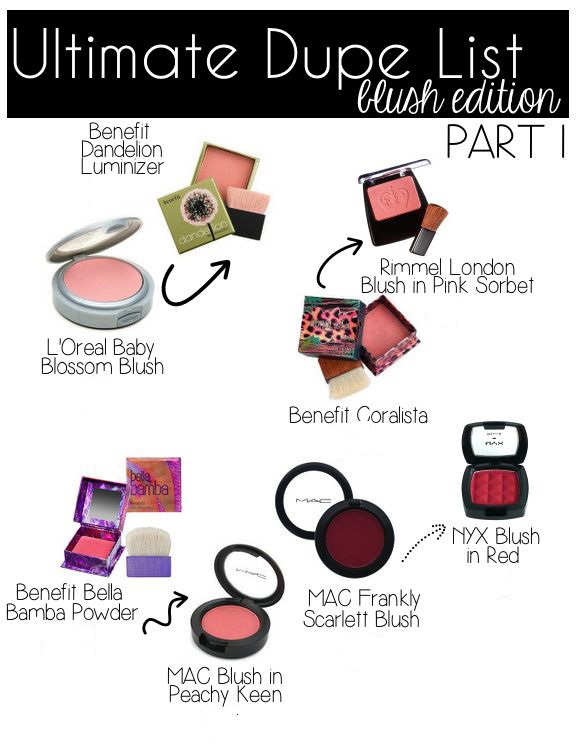
Finally, I wanted to add in some of the blush dupes I found on Pintrest. Although the alternate of the Benefit blush was listed as MAC Peachy Keen, there are loads of drugstore alternatives out there that can be used instead if the MAC blush is too expensive. However, the other 3 comparisons are all very affordable and all cost under £10. 


Wednesday, 24 February 2016

Kylie Jenner Inspired Make-up Look

Hello my lovelies! Today I am coming to youse with an inspired make-up look from one of the hottest young females in Hollywood right now- Kylie Jenner. Just like her sisters, Kylie Jenner is an absolute beauty and her make-up is to die for. In these pictures above, Kylie is sporting a "natural" glam make-up look and I thought this would be quite easy to re-create. Although the lip colours are different, the over-all makeup in each appears very similar. With my help, I am going to show youse how to re-create this look for yourself, and of course, on a budget!

Steps:

1. Starting off, we first have to prepare the base. Moisturising and priming is key to help the make-up stay in place and create a nice smooth canvas. Applying the moisturiser you currently use, I would recommend waiting around 5 minutes just to let that sink into your skin. For primer I would use the Rimmel Stay Matte Primer. Like myself, Kylie always seems to have a very matte complexion, which is great if you are oily like myself and like being matte.

2. Now that we have our base ready, onto foundation! Since we have a matte foundation, I am going to recommend using a foundation that is not specifically tailored to the oiler skin types. To create the full coverage effect such as Kylie, the L'Oreal true match foundation is perfect! Using a Real Techniques beauty sponge with this foundation will give a flawless coverage. Remember when using this sponge to ensure its damp before use.

3. Onto concealer! A drugstore fave of mine is the collection lasting perfection concealer. Applying this under the eyes and onto any pimples will help ensure that full coverage. To set all this we must of course use the Ben Nye setting powder. This product is absolutely amazing, and I would 100% recommend this for all your make-up looks.

4. Made popular by her famous Kardashian sisters, contouring is key for this make-up look. I have linked a blog post all about highlighting and contouring which hopefully is useful for this part of the tutorial. The sleek palette is ideal for this as it has both the darker shade for chiselling out those cheeks and a lighter colour for making those cheek bones pop! http://beauty-and-thebudget.blogspot.co.uk/2016/02/how-to-contour-and-highlight.html

5. Although Kylie's brows aren't strong, they are very perfect and filled in. To recreate this I would use your natural eye brow shape and fill in sparse areas in your eyebrows with the Rimmel eyebrow pencil. Using a pencil will help mimic the hairs in the eyebrow and create a natural look similar to Kylie's.

6. Kylie's eye look in the pictures above looks very natural, however the eyelashes are very long, wispy and doll like. Using a black liquid liner, I would draw a thin line across the top eyelash line with the Miss Sporty Liquid Liner. For lashes I would generously apply a couple of coats of the Maybelline Volume Express mascara to both top and bottom sets. To achieve Kylie's exact look, applying a pair of the Eylure lashes in 141 will really finish the eye look off. 

7. In the above photo's of Kylie two different lips can be worn with this look. The Revlon Colorburst Matte Balms, would be ideal for recreating the look on the left hand side. The two shades I would recommend would be 'fierce' and 'standout'.  On the right hand side photo, the lip colour that Kylie appears to be wearing is very similar to her natural tone, but with a pink gloss over the top. A fave of mine would be the Natural Collection lip gloss in Turkish Delight.

Products Mentioned

Real Techniques Mircale Complexion Sponge £5.99 http://www.boots.com/en/Real-Techniques-Miracle-Complexion-Sponge_1389470/
Collection Lasting Perfection Concealer £4.19 http://www.boots.com/en/Collection-Lasting-Perfection-Concealer_1693350/
Miss Sporty Studio Lash Liquid Liner £2.49 http://www.boots.com/en/Miss-Sporty-Studio-Lash-Liquid-Liner_1237956/
Natural Collection Juicy Lips Lip Gloss£1.99 http://www.boots.com/en/Natural-Collection-Juicy-Lips-Gloss_24284/


and ta-dah! You should be looking just as beautiful as Kylie Jenner! Feel free to use alternative products you have in your own make-up kit to re-create this look. If you have any suggestions on what other celebrity make-up looks you would like to see feel free to leave a comment below. Thank you for reading and until next time,


Wednesday, 17 February 2016

How to: Contour and Highlight


Recently, contouring and highlighting has become a massive craze, and once mastered can transform your entire face. Applying foundation to your face creates a blank canvas, so to add dimension back in we use contouring and highlighting. Let's go back to basics: in art class darker colours would be used to push areas back, whereas light colours would be used to bring areas forward. Essentially this is what is being achieved by contouring (pushing parts of your face back) and highlighting (bringing areas of your face forward).

Both cream and powder products can be used to create the desired look, however for all my beginners out their I would stick to the powder products, as they are easier to blend and wont leave you with any harsh unblended and unnatural lines.

Here comes the harder part. To achieve the best contour and highlight that would suit you, you should work out what face shape you have. Shown below are the best ways to highlight and contour your face depending on the face shape you have. If you are struggling to work out which of the face shapes you have, I've added a link to help you work out which you have. 


Below I have also gathered a few of my favourite products for contouring and highlighting, both higher end and those that are on a budget! Depending on your skin tone, these may not be suitable for yourself, but I would recommend for contouring to stick to a product which looks ashy (has a grey undertone- mimics shadows better) and matte.

Contouring
Splash the Cash:
Stash the Cash:

Highlighting
Splash the Cash:
Becca Cosmetics Jaclyn Hill Skin Perfector Pressed Champagne Pop £30 https://www.cultbeauty.co.uk/becca-jaclyn-hill-shimmering-skin-perfector-pressed-champagne-pop.html
Stash the Cash:

STEPS:
1.     After you’ve applied your foundation all over your face and neck, set with a powder, this will create a canvas for your powder contour and will be easier to blend.
2.     Depending on your face shape, start with contour. Follow the guide above to see where to place the darker colour to add more structure. For example, sweep the brush underneath the cheekbone to hollow it out and look more structured. Always start with a little product and build it up: it is easier to add colour than to take away!
3.     Next take your highlighter and add to the face with a separate brush. It is important to use these products with different brushes, otherwise the desired look may not be created.
4.     To ensure everything is blended, take your powder brush and sweep over these areas, to ensure a natural finish.

Hopefully these quick tips help you achieve flawless contour and highlight! Good luck babes and I'll see youse in my next post,